 anotemy
Sign in
Try it free
How to Study Neuroanatomy: A Step-by-Step Method
To study neuroanatomy effectively, break it into two steps: first, build accurate 3D mental models of the major brain regions; second, draw each pathway as a diagram showing where it starts, crosses, and ends, then quiz yourself on lesions.
Why neuroanatomy feels hard
Neuroanatomy is the study of the structure and organization of the nervous system, and it feels hard because it demands three separate skills at once.
First, neuroanatomy is inherently 3D. Structures like the brainstem or thalamus sit deep inside the brain, and their relationships change depending on the angle of section. You can't memorize a flat diagram and expect to recognize the same structure on an MRI or in a cross-section.
Second, neuroanatomy is about connections. Pathways such as the corticospinal tract or the spinothalamic tract have multiple synapses, decussations, and relays. Understanding a pathway means knowing where it starts, where it crosses, and where it ends, not just its name.
Third, you are tested through lesions. Exams ask what happens when a specific artery occludes or a nucleus degenerates. That requires linking structure to function, which is only possible if you have a solid 3D map and a clear picture of the pathways.
Step 1: Build a 3D mental model
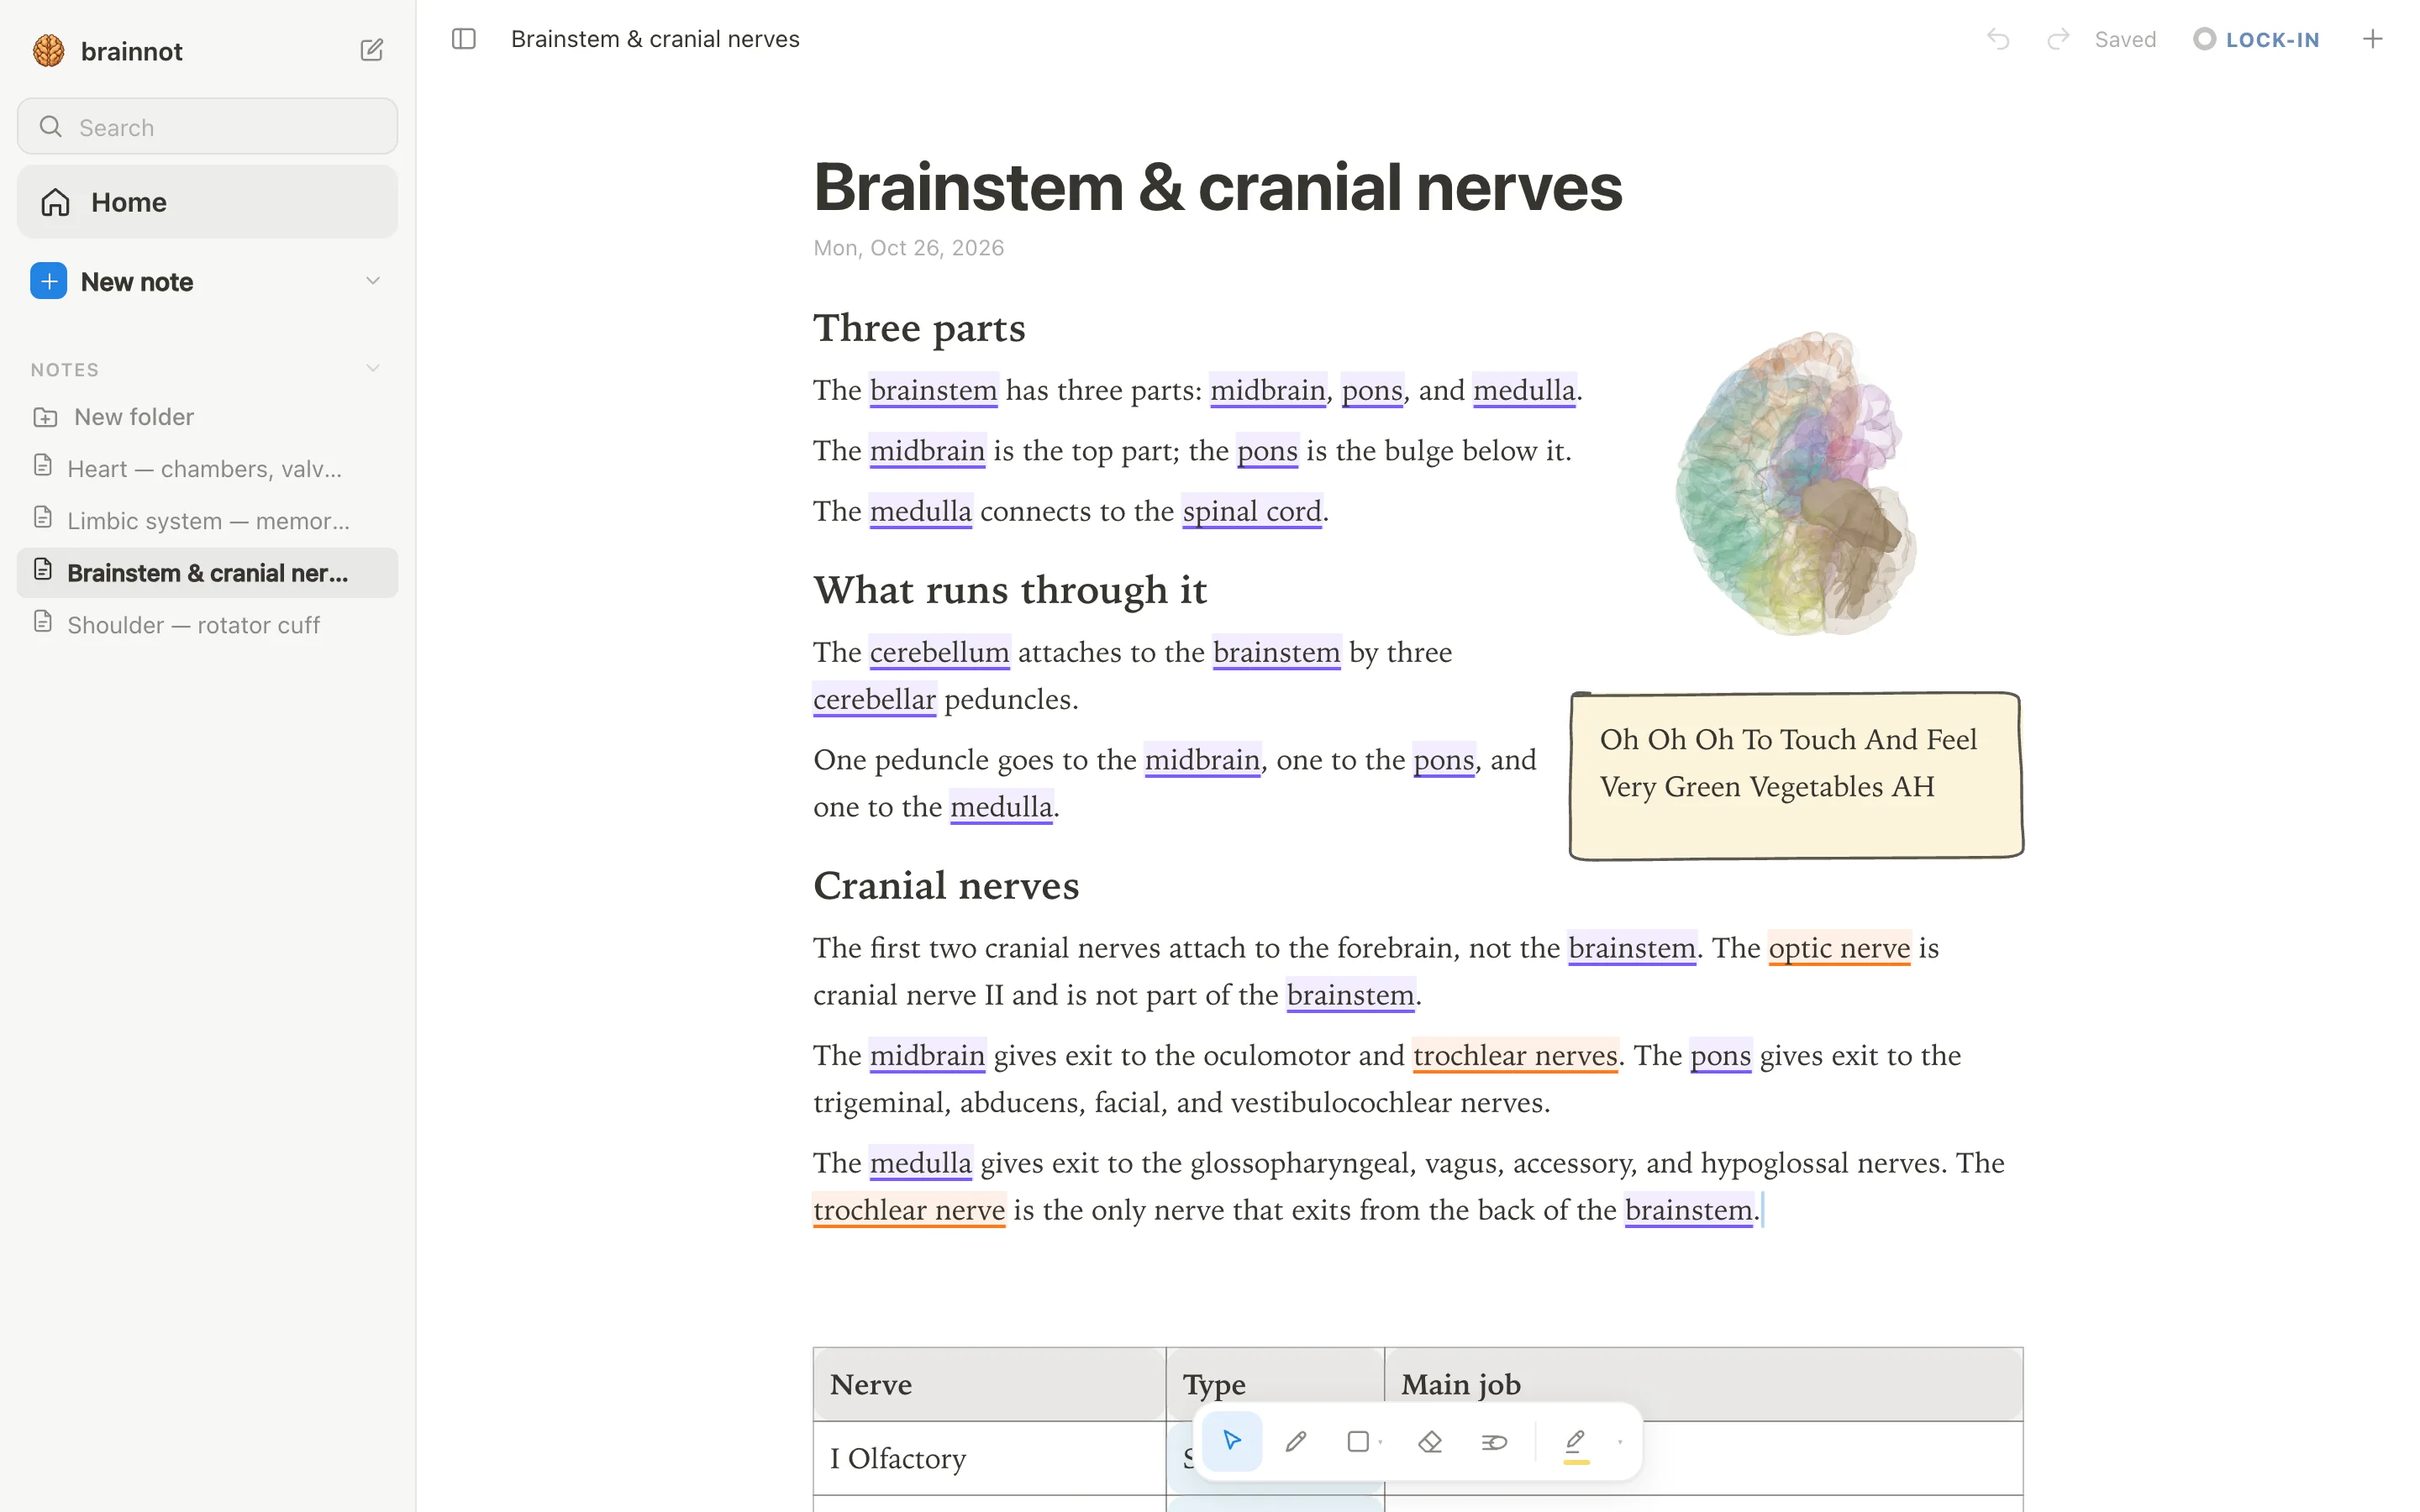
Start with the five major divisions: cerebrum, thalamus, brainstem, cerebellum, and spinal cord. Use a 3D atlas or an app like anotemy to rotate each structure and see how it relates to the others. For example, in anotemy, you can type 'thalamus' and see it lit inside a see-through brain, then rotate the view to see it from above, below, and the side.
The goal is not to memorize every sulcus yet. The goal is to build a mental model where you can close your eyes and imagine the position of these structures relative to each other. Once you can do that, adding smaller structures like the basal ganglia or the cranial nerve nuclei becomes much easier.
Spend a few days just on this step. Draw the big parts from memory, label them, and check yourself. A common mistake is to jump straight to pathways or lesions, but without a 3D scaffold, those details will not stick.
Step 2: Draw each pathway as boxes and arrows
Once you have the 3D map, take one pathway at a time. Start with the corticospinal tract or the spinothalamic tract. Draw it as a simple diagram: a box for the origin, an arrow for the axon, a circle for the synapse, and another box for the target. Mark where the pathway decussates, because that is often the key to localizing a lesion.
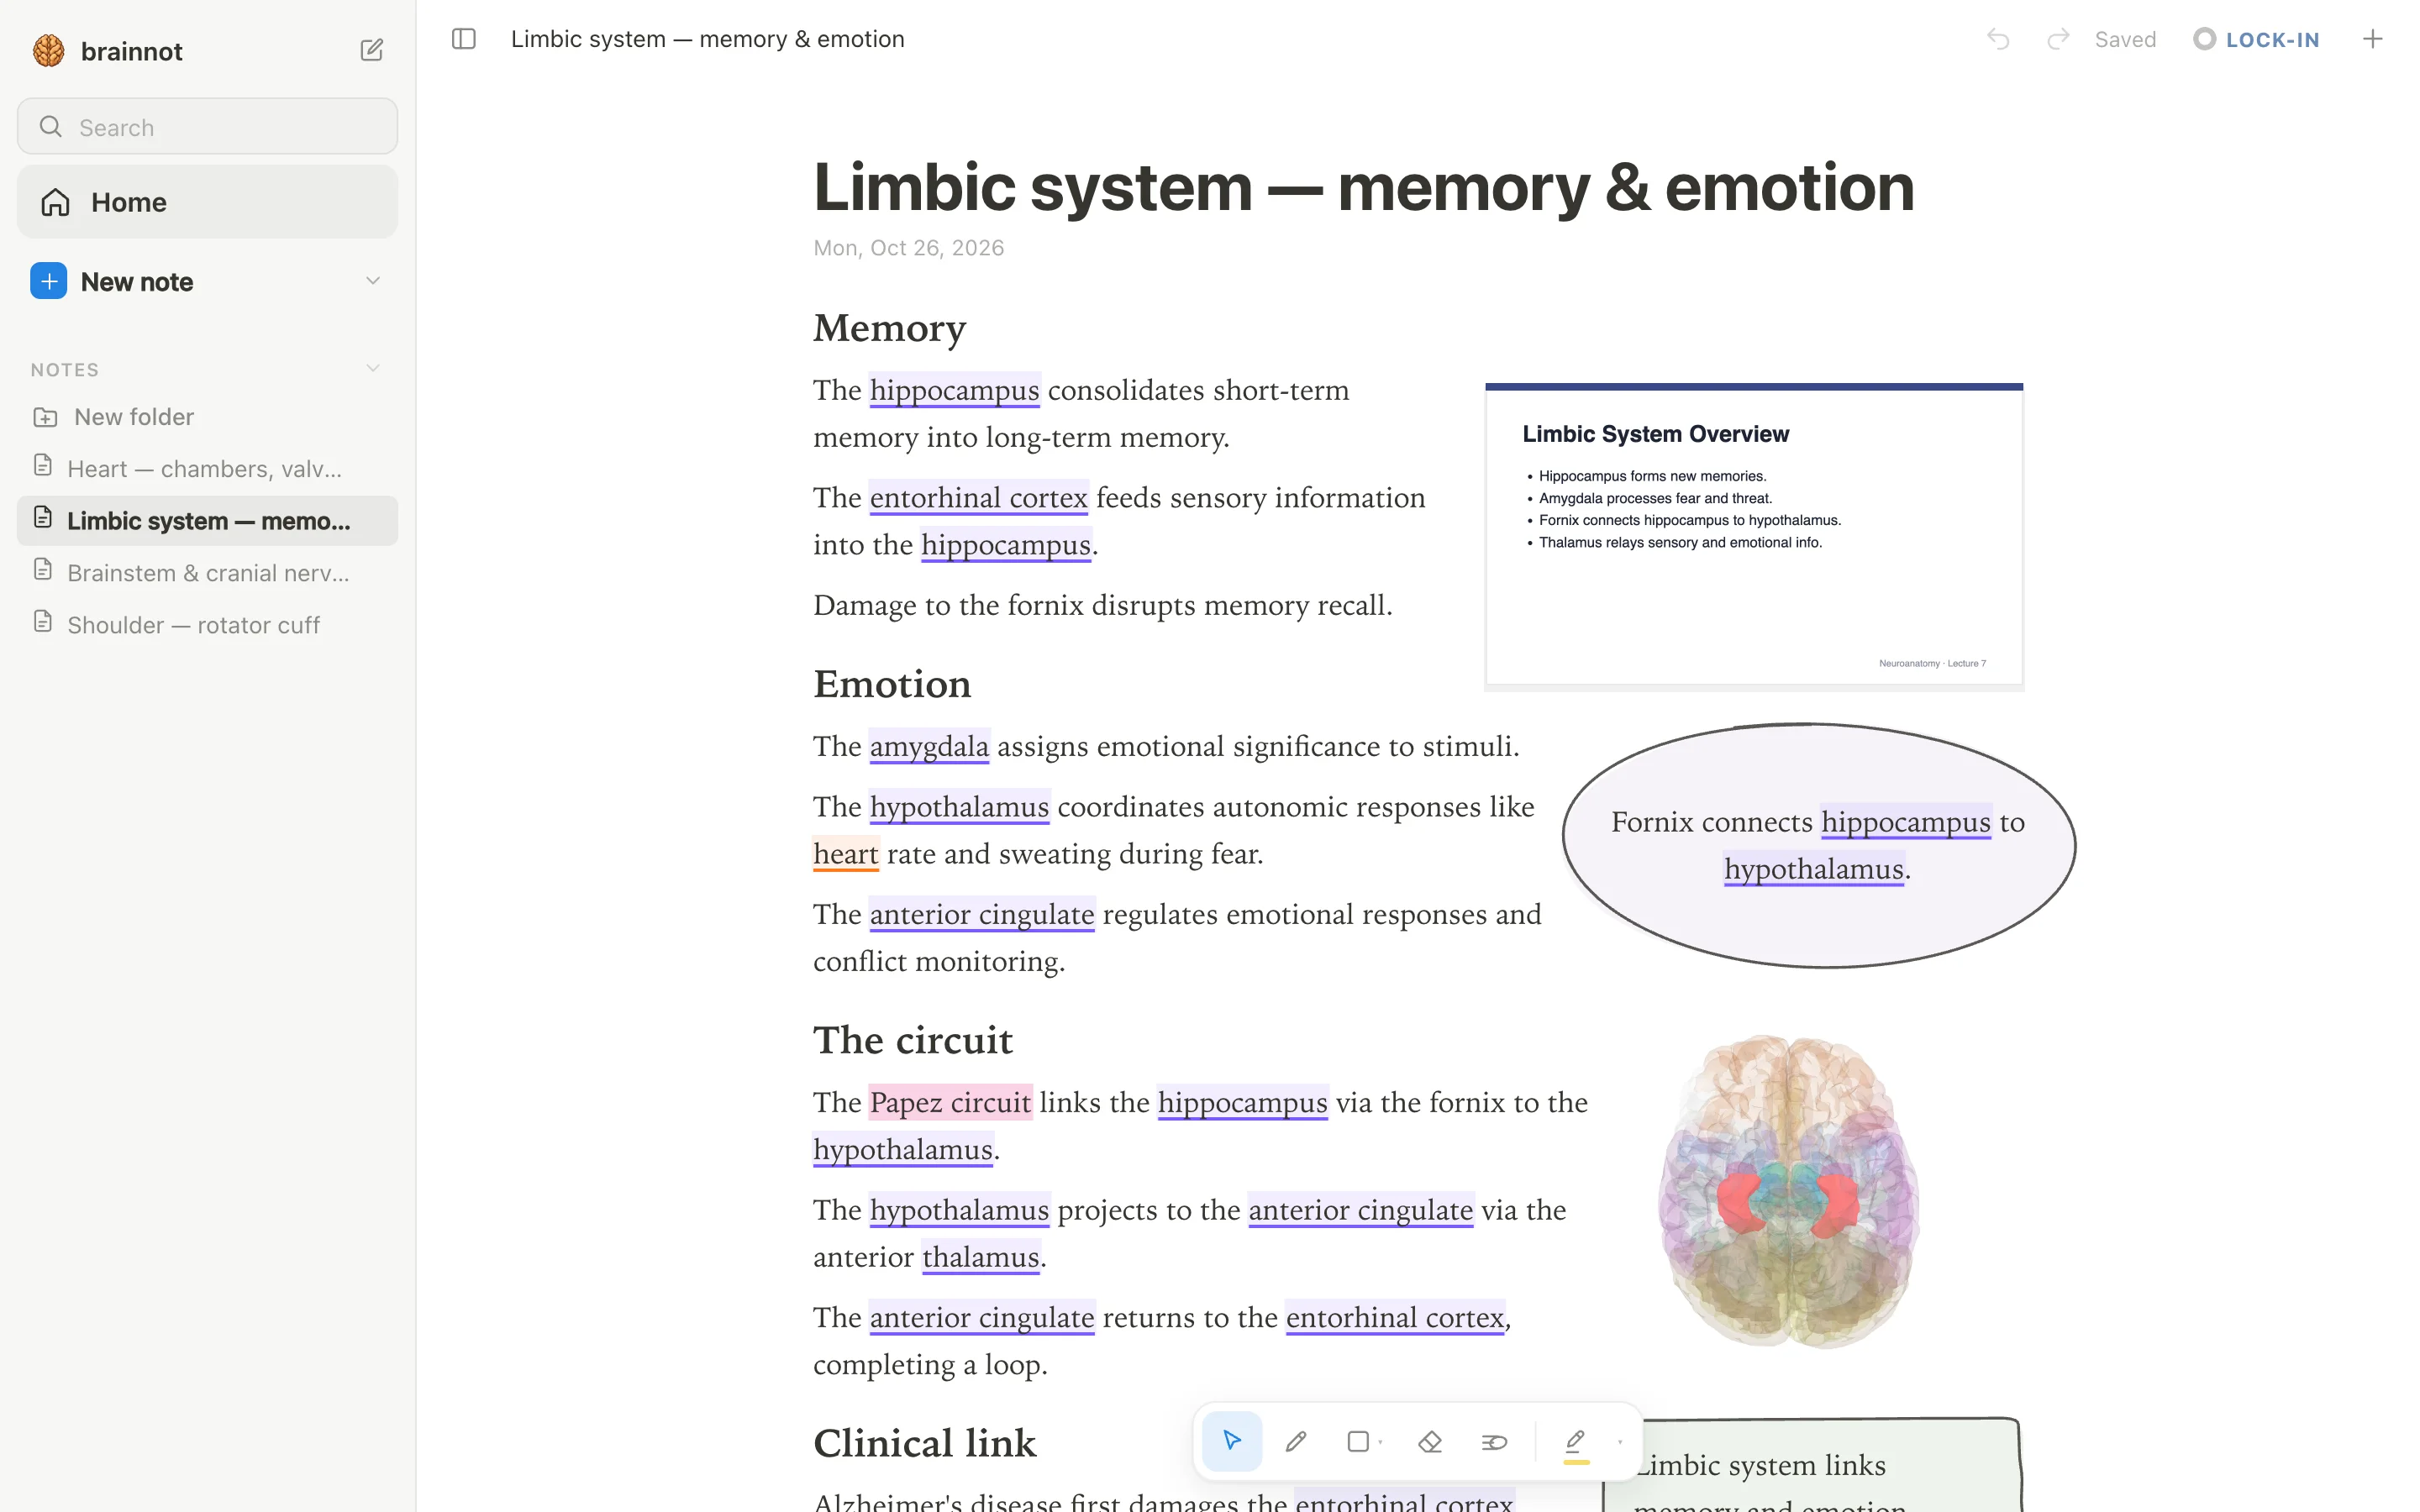
Use active recall: draw the pathway from memory, then compare with your notes. In anotemy, you can keep your notes alongside a 3D model and hand-draw boxes and arrows that wrap around the text. For example, you could type 'brainstem' to see the structure, then draw the corticospinal tract descending through it.
Test yourself with lesions: 'A stroke in the left internal capsule causes what?' or 'A lesion in the medial lemniscus at the level of the medulla causes loss of what sensation and on which side?' If you can answer these without looking, you have learned the pathway.
Step 3: Know the cranial nerves
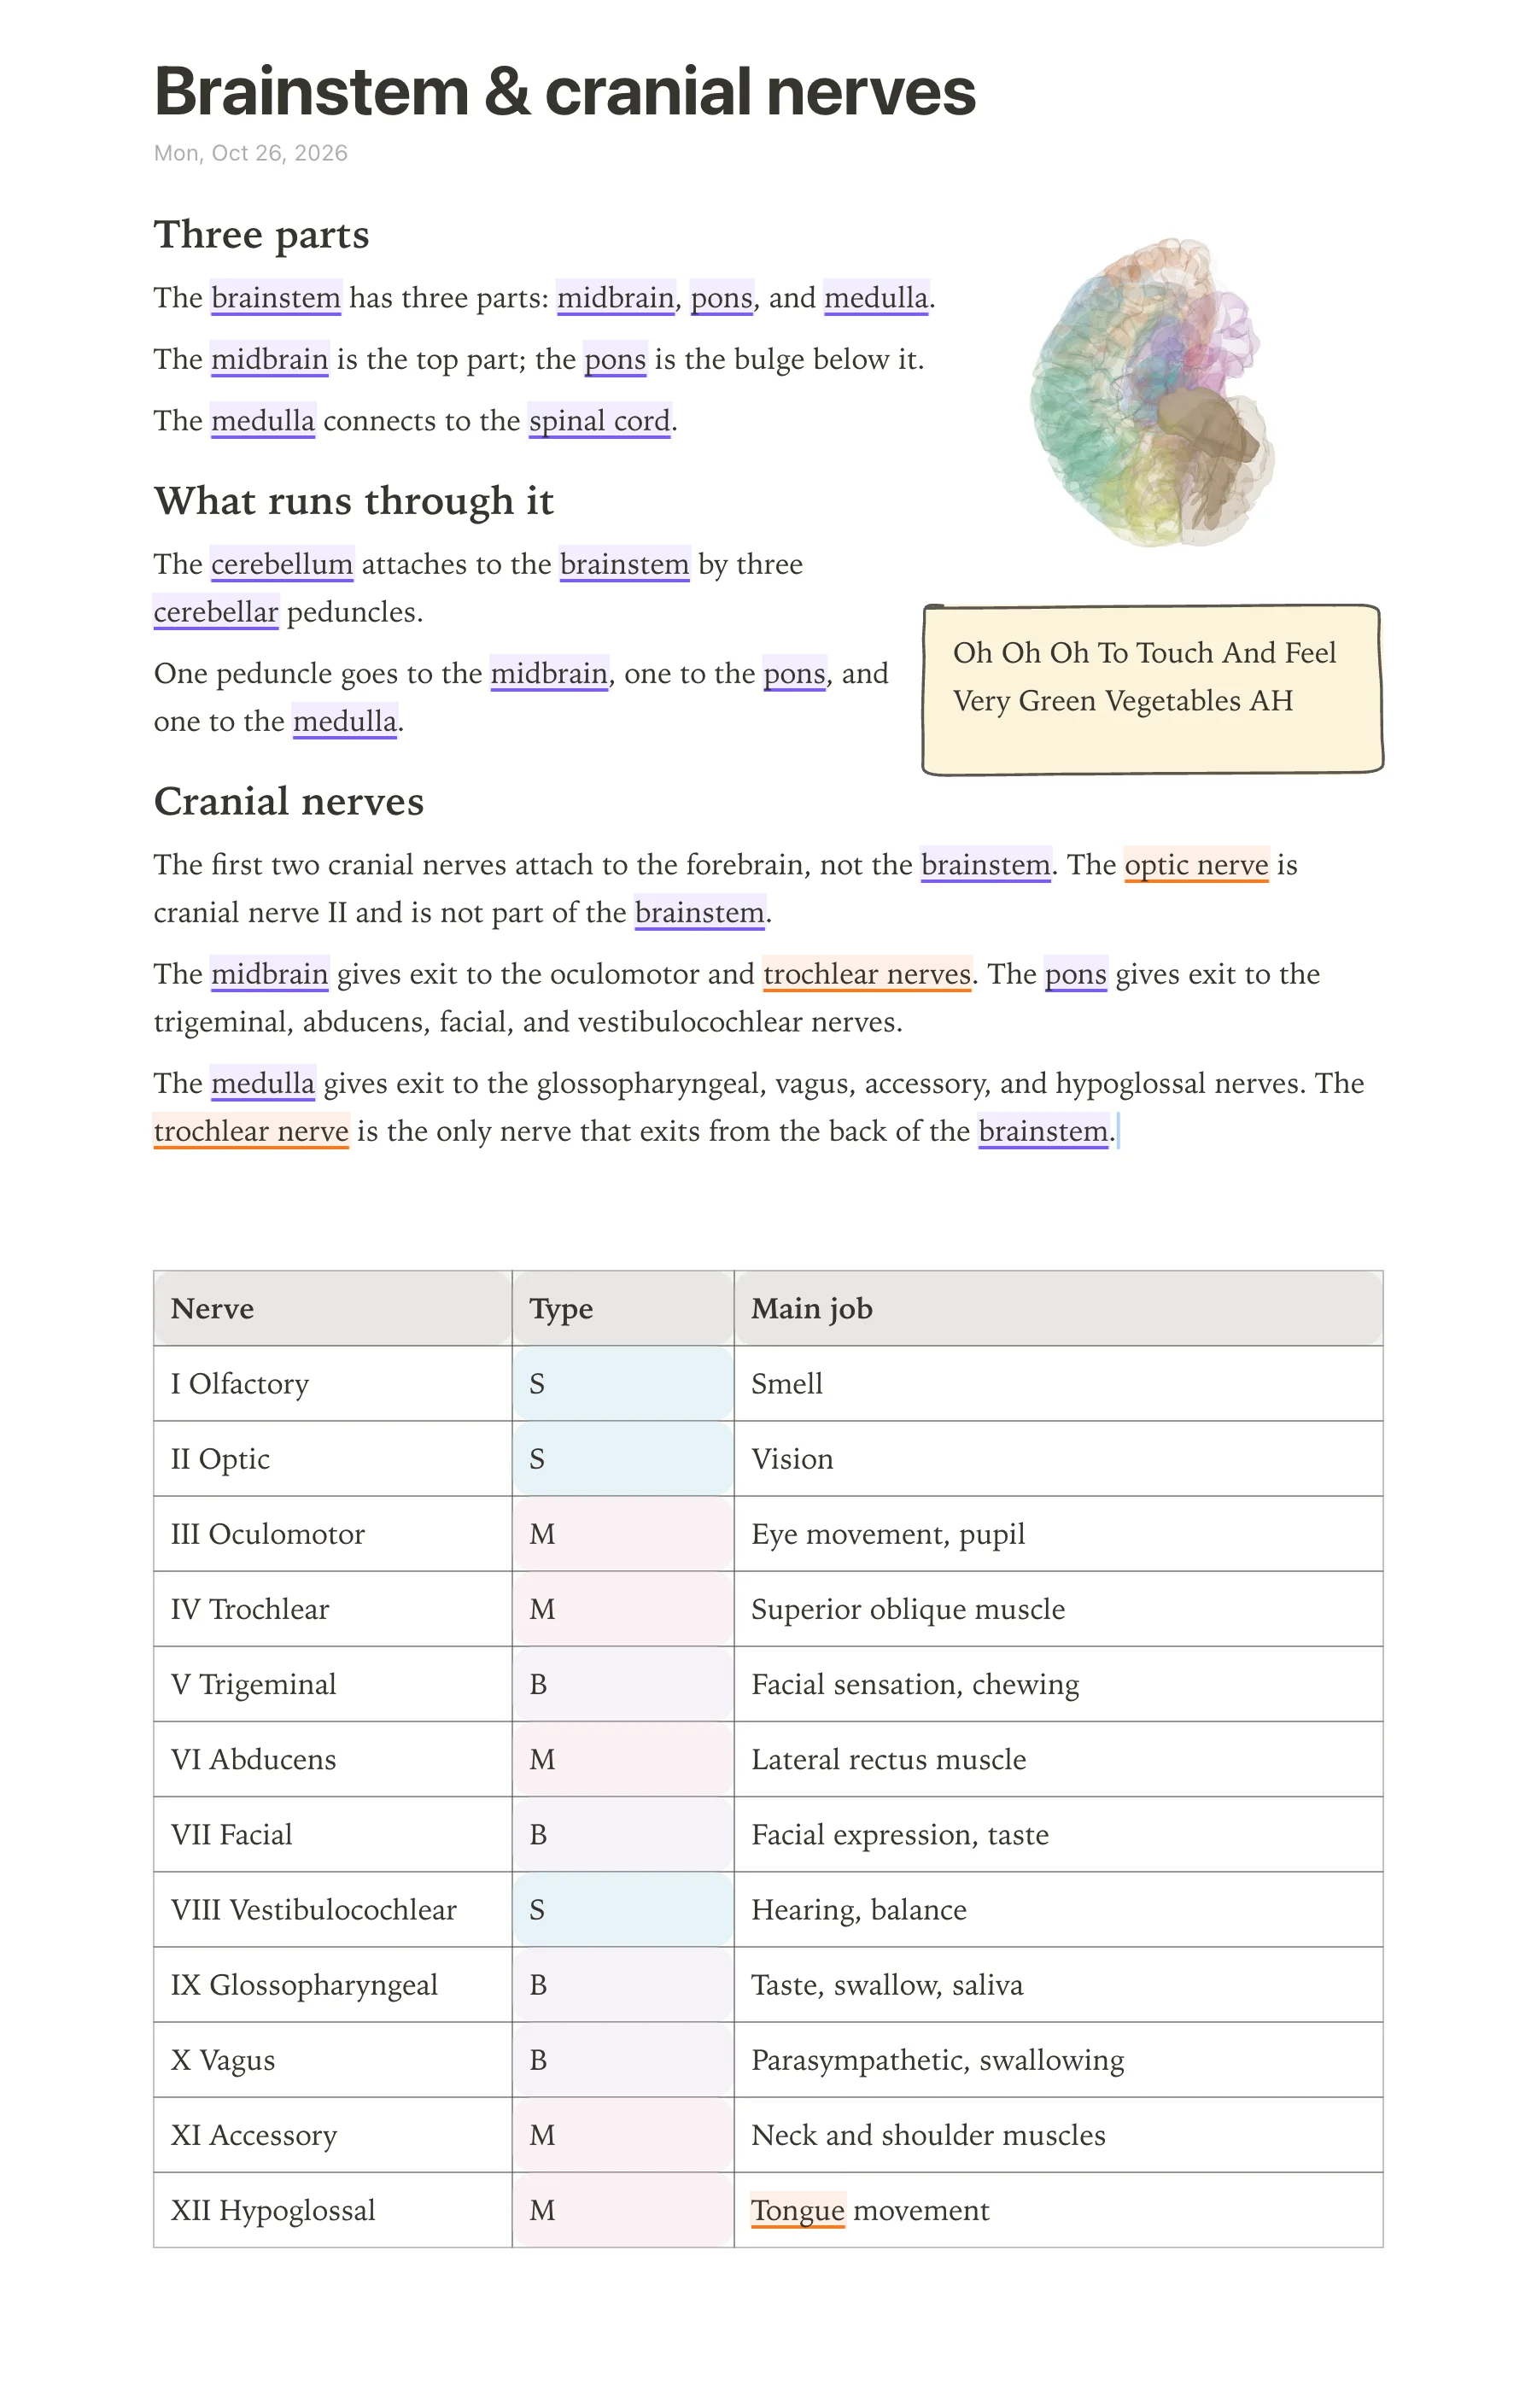
The cranial nerves are the 12 pairs of nerves that connect directly to the brain, and they carry sensory, motor, or both types of information between the brain and the head, neck, and some organs in the chest and belly. Neuroanatomy exams expect you to know each nerve by number and name, whether it is sensory, motor, or both, its main job, and where it leaves or enters the brainstem.
Use a table to see all 12 nerves at once, because that is how you will spot patterns quickly. For example, the first two nerves attach to the cerebrum, not the brainstem, and the trochlear nerve is the only one that exits from the back of the brainstem. In anotemy, you can type the word “brainstem” and open it in 3D to see exactly where these nerves attach.
The table below lists each cranial nerve in order, its type (sensory, motor, or both), a short description of its job, and where it leaves the brainstem or brain. Keep this table in your notes and cover one column at a time when you quiz yourself.
| Number | Name | Sensory/Motor/Both | Main job | Where it leaves the brainstem |
|---|---|---|---|---|
| I | Olfactory | Sensory | Smell | Cerebrum (olfactory bulb) |
| II | Optic | Sensory | Vision | Cerebrum (optic chiasm) |
| III | Oculomotor | Motor | Moves most eye muscles, raises eyelid, constricts pupil | Midbrain |
| IV | Trochlear | Motor | Moves superior oblique muscle of the eye | Posterior midbrain |
| V | Trigeminal | Both | Facial sensation; muscles of chewing | Pons |
| VI | Abducens | Motor | Moves lateral rectus muscle of the eye | Pons |
| VII | Facial | Both | Facial expression, taste to front of tongue, salivation and tears | Pons |
| VIII | Vestibulocochlear | Sensory | Hearing and balance | Pons–medulla junction |
| IX | Glossopharyngeal | Both | Taste to back of tongue, swallowing, salivation, carotid body | Medulla |
| X | Vagus | Both | Parasympathetic to heart, lungs, and gut; swallowing and speech | Medulla |
| XI | Accessory | Motor | Moves sternocleidomastoid and trapezius muscles | Medulla and upper spinal cord |
| XII | Hypoglossal | Motor | Moves tongue muscles | Medulla |
Step 4: Practise lesions for each structure
A lesion is damage to a specific part of the nervous system, and asking “what is lost if this structure is damaged?” turns passive reading into active problem solving. Write a short list for each major structure: the structure name on one side, and the expected deficit on the other.
Start with the brainstem, because many cranial nerve problems point to a level of damage there. For example, damage to the midbrain can affect the oculomotor nerve and cause the eye on that side to point down and out with a dilated pupil. Damage to the pons can affect the abducens nerve, so the eye cannot look outward.
Then move to cortical areas. Damage to the hippocampus makes it hard to form new memories, while damage to the amygdala can blunt fear responses. In anotemy, type any of these words—such as hippocampus, amygdala, or brainstem—and the structure lights up in 3D, so you can see why a lesion there causes a specific loss.
Do not just memorize a list; draw a small diagram for each lesion. For example, draw a box for the brainstem and an arrow to the eye with “CN III” written on it, then write “eye down and out” at the end. Keep these lesion notes in one anotemy page and use the quiz feature to test yourself on each structure.
Step 5: Use active recall daily
Active recall means pulling information out of your memory instead of re-reading or highlighting, and it is the strongest way to remember neuroanatomy. Take the tables and lists you made in anotemy, hide one column or one side of a list, and try to say the missing part out loud or write it down.
For the cranial nerves, cover the “main job” column and go through each nerve number and name, saying what that nerve does. Then cover the “where it leaves the brainstem” column and see if you can place each nerve at the correct level: midbrain, pons, or medulla. Do the same for your lesion lists: cover the deficit and name the structure, then cover the structure and name the deficit.
anotemy does not have a spaced-repetition scheduler like Anki, so use it alongside anotemy for spaced review, but keep your active recall quick sessions inside anotemy itself. Open the same page every day, cover a different column, and mark the items you miss. Revisit only the missed items later that day, and then move the whole page into a weekly review.
Common mistakes
- Mistake: Memorizing the cranial nerves as only a list of numbers and names, without the function or brainstem level. Fix: Always study the full table with number, name, type, job, and exit point, and quiz yourself on one column at a time.
- Mistake: Forgetting that the olfactory and optic nerves are not attached to the brainstem, but to the cerebrum. Fix: Draw a simple sagittal brain and mark the olfactory bulb and optic chiasm separately from the brainstem exit points.
- Mistake: Mixing up which cranial nerves are sensory, motor, or both. Fix: Use the mnemonic “Some Say Marry Money But My Brother Says Big Brains Matter More” where S = sensory, M = motor, B = both, and check it against your table.
- Mistake: Treating a lesion as just a name without visualizing where it is in 3D. Fix: In anotemy, type the structure name (such as brainstem or hippocampus), tap the word to see the 3D view, and then think about what fibers pass through or near that area.
- Mistake: Passive re-reading instead of active recall. Fix: Cover the answer column in your table or list, say the answer out loud, then uncover to check. Do this every day, not just before the exam.
- Mistake: Trying to learn everything at once without connecting structure to function. Fix: For every structure you study, write one sentence that links its location to its job and one sentence that says what happens when it is damaged.